One of the defining strengths of TurboCAD is its flexibility in adapting to various design disciplines—from...
Latest posts
-
 TurboCAD Tip: Mastering Angular Step Angle for Precision DrawingRead more
 -
 What is the Remove Overlapping Entities Tool?Read more
The Remove Overlapping Entities tool is a command that can be accessed from the Modify menu, or by typing OVERKILL on...
-
 TurboCAD and 4K Compatibility: Crisp, Scalable UI for Modern DisplaysRead more
In today's era of high-definition visuals and ultra-sharp displays, software must evolve to meet the demands of...
-
 Design DirectorRead more
The Design Director is a powerful and convenient palette in TurboCAD that helps you streamline your work and enhance...
-
 TurboCAD for AutoCAD UsersRead more
Once you’ve made the decision to use TurboCAD, this guide will help you get started by outlining the few differences...
-
 TurboCAD Drafting Palette: A Powerful Tool for 2D DocumentationRead more
One of the most powerful, yet least known tools in professional versions of TurboCAD is the Drafting Palette. The...
-
 IMSI Design Releases DesignCAD ™ 2025Read more
Sharper, Faster, and More Efficient NOVATO, Calif. – June 4, 2025 – IMSI® Design, a global leader in CAD software...
-
 IMSI Design Releases FloorPlan® 2025Read more
Revolutionary Tools for Landscape Design and Photorealistic Rendering NOVATO, Calif. June 12, 2025 – IMSI® Design, a...
-
 IMSI Design Releases TurboCAD® Mac 16Read more
Introducing New AI-Powered Tools and Major Performance Upgrades NOVATO, Calif. June 19, 2025 – IMSI® Design announced...
-
 IMSI Design Releases TurboCAD® 2025Read more
Redefining Precision and Creativity in CAD Design NOVATO, Calif. – May 14, 2025 – IMSI® Design, a leader in CAD...
Blog categories
Search in blog
Archived posts

TurboCAD Tip: Mastering Angular Step Angle for Precision Drawing
One of the defining strengths of TurboCAD is its flexibility in adapting to various design disciplines—from architectural layouts to mechanical schematics. And among the suite of tools designed for precision and efficiency, Ortho Snap/Mode paired with a customized Angular Step Angle stands out as a deceptively powerful feature.
Whether you're sketching orthogonal building plans, isometric mechanical parts, or polar-style layouts, understanding how to manipulate the Angular Step Angle can greatly enhance both your speed and accuracy.
What is Ortho Mode in TurboCAD?
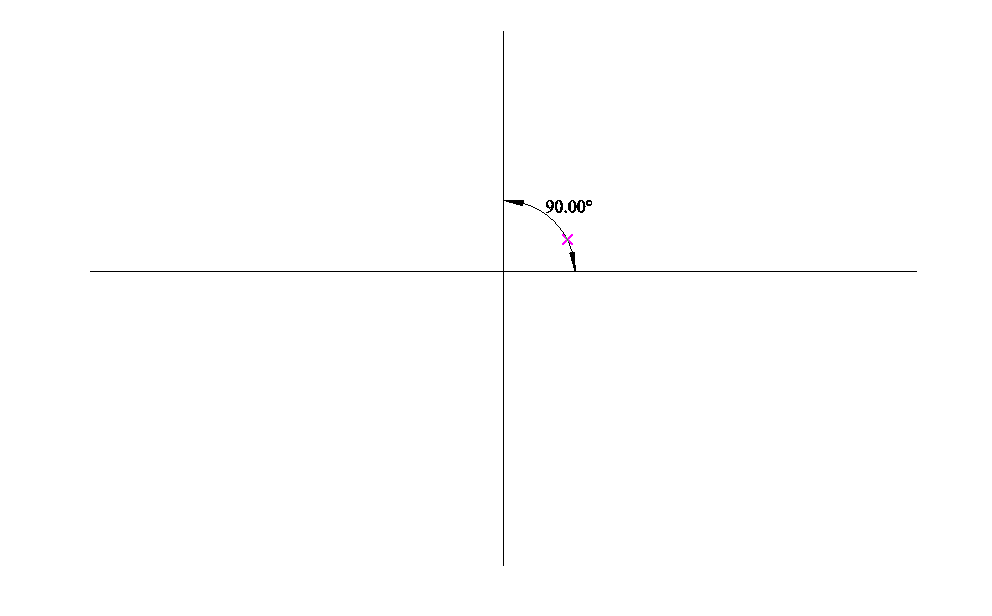
TurboCAD’s Ortho Snap/Mode allows users to constrain drawing angles to specific increments—most commonly used to draw straight, horizontal or vertical lines. You activate this mode by holding down the SHIFT key while drawing a segment (like a line, wall, or polyline). This locks the segment to a predefined angle relative to your current orientation.
By default, this angle is 90 degrees, which means your lines snap to vertical or horizontal, mimicking a typical drafting board workflow.
Customizing the Step Angle
While 90 degrees works well for many standard designs, TurboCAD allows users to adjust the Step Angle to suit different drawing needs. This customization can be especially useful when creating isometric or radial designs.
To change the Step Angle:
- Go to Options > Drawing Setup.
- Navigate to the Angle page.
- Locate the Step Angle field and enter your desired angle (e.g., 45°, 30°, 10°, etc.).
- Click OK or Apply to update your settings.
Once set, every time you use Ortho Mode (by holding SHIFT), your segments will snap to multiples of this angle.
Practical Use Cases for Adjusting the Step Angle
? Mechanical Design (Use 45° or 30°)
When working on mechanical parts—especially in 2D—isometric or exploded views, angles like 30° and 45° are common. Setting your step angle to these values allows for faster, more accurate alignment without constantly relying on angle snaps or reference lines.
?️ Architectural Sketching (Use 10° or 15°)
For early-stage architectural concepting, using smaller angles like 10° or 15° helps explore design ideas in a polar or radial layout. Curved paths, staircases, or angled roof lines become easier to sketch out fluidly while maintaining control.
? Polar Design & Landscaping (Use 15° or 22.5°)
When designing circular layouts—like gardens, stadiums, or compass-based orientation maps—a smaller step angle enables accurate radial drafting with minimal manual intervention.
? Isometric Drawing (Use 30°)
Isometric illustrations rely heavily on 30° and 60° lines. By adjusting your step angle accordingly, you can snap lines into perfect isometric alignment without needing separate construction geometry.
Pro Tip: Use in Combination with Polar Tracking
TurboCAD’s Polar Tracking feature complements the Angular Step Angle. While Ortho Mode locks drawing to specific angles temporarily (while holding SHIFT), Polar Tracking allows continuous visual guidance and snapping at defined angles—even without Ortho Mode engaged.
- To enable it, go to Options > Drafting Aids > Polar Tracking.
- Define your angular increments to match or supplement your Step Angle setting.
The two features working in tandem can dramatically speed up your design process.
When to Reset the Step Angle
Keep in mind that your Step Angle setting stays active across sessions until changed. If you’ve been working with a custom angle like 15°, it’s a good idea to reset it back to 90° before switching back to standard orthogonal drafting. This prevents unintentional off-angle drawing in your next project.
Posted in:
Blog
Related posts
-
TurboCAD Drafting Palette: A Powerful Tool for 2D Documentation
One of the most powerful, yet least known tools in professional versions of TurboCAD is the Drafting Palette. The...Read more
-
TurboCAD for AutoCAD Users
Once you’ve made the decision to use TurboCAD, this guide will help you get started by outlining the few differences...Read more
-
Design Director
The Design Director is a powerful and convenient palette in TurboCAD that helps you streamline your work and enhance...Read more
-
TurboCAD and 4K Compatibility: Crisp, Scalable UI for Modern Displays
In today's era of high-definition visuals and ultra-sharp displays, software must evolve to meet the demands of...Read more
-
What is the Remove Overlapping Entities Tool?
The Remove Overlapping Entities tool is a command that can be accessed from the Modify menu, or by typing OVERKILL on...Read more
Leave a comment